My Home Lab Setup - Part 1
I had an old laptop gathering dust, and I thought—why not turn it into a home server? And so, the journey begins.
Laptop Specs ->
| Component | Specification |
|---|---|
| Brand | Dell |
| Model | Vostro 3559 |
| Processor | i5-6200U |
| Memory | 8GB DDR3 |
| Disk | 256GB SSD |
Which should be good enough to start with home labbing.
Part 1 – Backing Up Everything
Before diving into the home server setup, I had to tackle a not-so-glamorous but super important task: backups. Over the years, I’d accumulated more than 200GB of data—photos, code, documents, you name it. Losing any of it was not an option.
After a bit of planning, here’s how I spread out my backups:
- Internal 1TB HDD: My main storage drive inside the laptop.
- External Sony 1TB HDD: For redundancy and easy portability.
- Google Drive: Thanks to a student offer, I got 2TB of cloud storage free for a year. (Details here)
Pro tip: Even after the Google Drive subscription ends, you get read-only access to your files for two more years before Google deletes anything. Read more.
With my data safely backed up in three different places, I was finally ready to start tinkering with the server setup—without the fear of losing anything important.
Part 2 – Basic Configuration
2.1 Battery Settings (BIOS)
Since I want this machine running 24/7, I made sure to tweak the battery settings in the BIOS for better battery health. I switched the battery profile from Standard to Custom (you can also use Primary AC Use if your BIOS has it). This helps the battery last longer when the laptop is always plugged in.
2.2 Operating System
Choosing the OS was easy: I went with vanilla Arch Linux. (Full disclosure: I didn’t install it myself—shoutout to my friend @rjanupam who handled that part!)
I skipped installing a window manager since this is a headless server.
If you want a nice web dashboard to manage your server, check out Cockpit. It’s super handy for monitoring and basic management over the network.
After the OS was up, I installed some essentials:
dockerdocker-composefastfetchbtopfish(my favorite shell)
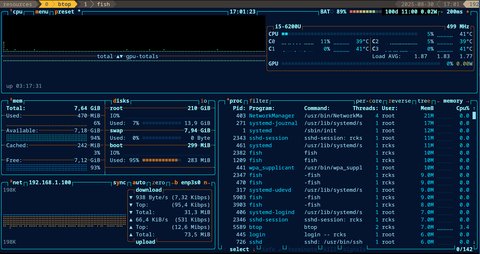
The setup is super lightweight. Here’s what the btop dashboard looked like right after installation:
2.3 Network – Static IP (DHCP Binding)
To make sure my home server always has the same local IP, I set up DHCP binding on my router. Now the server always gets 192.168.1.100 (or whatever you prefer). This makes it much easier to access and manage on my network.
Part 3 – The CGNAT Wall: My ISP Adventure
If you’ve ever tried to expose your home server to the internet, you know the dream: open a few ports on your router, grab your public IP, and voilà—remote access from anywhere. That’s what all the guides say, right? I was excited to try it out, but reality had other plans.
At first, I discovered my ISP (Airtel, in my case) doesn’t provide a static IP by default. Instead, you get a dynamic IP, which means every time your router reboots, you’re assigned a new address from their pool. Not ideal, but not a dealbreaker—unless you want reliable remote access.
3.1 The Static IP Trap
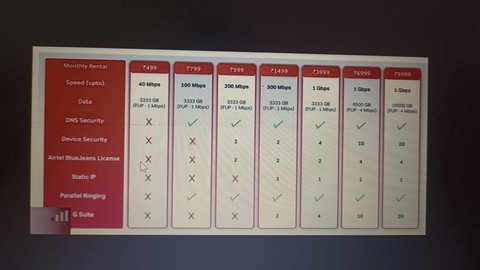
The obvious solution? Buy a static IP. But paying that much ain’t my budget or something I’m willing to spend on a home project. Airtel (my ISP) charges a hefty premium for static IPs, and you usually have to upgrade to a business plan.
3.2 Enter DDNS (Dynamic DNS)
Next up: Dynamic DNS. The idea is simple—use a service like No-IP or DuckDNS to keep your ever-changing IP in sync with a domain name. Unfortunately, DuckDNS has been down for a long time, so I went with No-IP instead. I plugged the credentials into my router’s DDNS settings and crossed my fingers.

But… it still didn’t work. The DDNS service was updating just fine, but I still couldn’t access my server from outside my network.
3.3 The CGNAT Plot Twist
After a lot of troubleshooting and reading, I stumbled upon the real culprit: CGNAT (Carrier-Grade NAT). My ISP uses CGNAT, which means your “public” IP is actually shared with dozens (or hundreds) of other customers. No matter how many ports you forward, your traffic never actually reaches your home network.
TL;DR: If your ISP is using CGNAT, the usual tricks like port forwarding and DDNS just won’t cut it. You’ll need to get creative—think tunnels, VPNs, or just pay for a static IP. 😉
Part 4 – Cloudflare Tunnel: Beating CGNAT
At this point, I realized that if I wanted to access my home server from anywhere in the world (and not just my living room), I needed to get around the CGNAT wall. Enter: Cloudflare Tunnel.
Big thanks to the GitHub Student Developer Pack for all the awesome benefits for students! I used get.tech’s GitHub Student offer to grab a free .tech domain, set up Cloudflare DNS, and got ready to work some magic.
Here’s a high-level diagram of what’s going on:

Basically, instead of exposing my home IP directly (which my ISP won’t even let me do), I set up a secure tunnel from my home server to Cloudflare. All the traffic to my domain gets routed through Cloudflare’s network, and then straight to my server—no port forwarding, no static IP, no headaches.
I set up a few subdomains like matrix.<my-domain>.tech for my services, and just like that, my home lab was accessible from anywhere.

Part 5 – Spinning Up the Fun: Installing My Services
With Cloudflare Tunnel in place, my home server was finally accessible from anywhere. Time to actually run some cool stuff on it! Enter Docker—the magic wand for self-hosters. Here’s what I set up first:
1. Portainer: Container Management
Portainer is a powerful tool for managing containers. I used it to deploy my services easily from the browser, and it was a game-changer to be able to control everything remotely while sitting at another system—no more SSH-ing in for every little thing!
2. Matrix: Lightweight Private Messaging
WhatsApp Web and Signal are resource-hungry, and every time I opened them, my laptop fans would start spinning like crazy. My friends and I were desperate for something lighter, more private.
That’s when I decided to roll out my own Matrix Synapse server. Setting it up with Docker was pretty straightforward -> Matrix Synapse Docker Guide
I restricted registrations so that only accounts I create can join—keeping it limited to just my friends. I thought about enabling federation (connecting my server to the wider Matrix network), but decided against it for now due to security concerns. For the time being, it’s a private chat space, not open to the public.
3. VaultWarden: Self-Hosted Password Manager
I used to be a KeePass fan, but syncing that .kdbx file across devices was always a pain. Now that I had a home server, I figured—why not host my own password manager?
Enter VaultWarden (the lightweight, self-hosted Bitwarden alternative). I’ll admit, I was a bit nervous about exposing my password vault to the internet. What if someone brute-forced my master password while I was asleep? But after some research, I found out VaultWarden supports 2FA, which made me feel a lot better about the whole thing.
So now, my passwords are always in sync, and are exposed to the internet.
Part 6 – Pi-hole: Network-Wide Ad Blocking
After getting the main stuff working, I wanted to block ads and trackers for everything at home. I went with Pi-hole. It basically acts as a DNS server that blocks ads for every device on your network.
At first, I tried running Pi-hole in Docker (because why not), but the networking was a pain. My router and Docker’s networks didn’t get along, so I gave up and just installed Pi-hole directly on the server with yay.
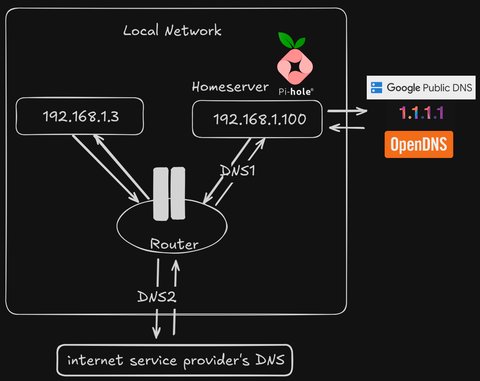
Once it was running, I changed my router’s DNS settings so everything on my WiFi would use Pi-hole:
- Open your router settings (usually under LAN > DNS)
- Set DNS1 to your server’s IP (where Pi-hole is running)
- Set DNS2 to
0.0.0.0or leave it as the default, just in case
And that’s it! Suddenly, every device in my house—phones, laptops, smart TVs—was enjoying a cleaner, ad-free internet experience. There’s something deeply satisfying about knowing you’ve banished ads and trackers not just for yourself, but for everyone on your network.
The End
This is just the beginning of my homelab adventure—there’s a whole world left to explore! I’m honestly amazed at how much I’ve been able to run on this little server.
Here’s a quick look at my server’s resource usage:
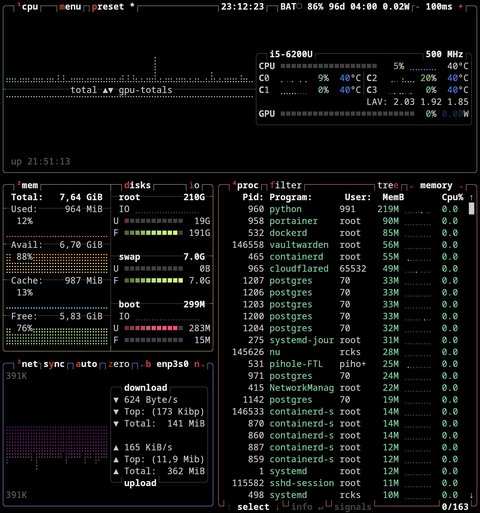
Total memory used: 964MB 🙌
Everything is super lightweight, even with all these services humming along, my memory usage hasn’t even crossed 1GB! I’m honestly pretty happy with how smooth it’s all running and is available 24x7.
Thanks for reading! ✌️